

To test a refrigerator compressor relay, first, unplug the refrigerator and access the relay behind the refrigerator’s rear panel. Next, remove the relay and use a multimeter set to ohms to check for continuity.
Troubleshooting a refrigerator’s health often includes examining the compressor relay, a pivotal component ensuring the compressor’s proper function. This small device directs power towards the compressor; if it malfunctions, the refrigerator may not cool efficiently, leading to spoilage and increased electricity bills.
Regular checks can preempt failures, mitigating inconvenience and expense. Homeowners can perform a simple diagnostic test using a multimeter, an indispensable tool in appliance repair. Understanding how to evaluate the relay’s condition can save time and money by pinpointing issues without calling a professional. The process, which blends technical insight with practical steps, must be conducted with precision to ensure the accuracy of the diagnosis and the safety of the investigator.
Credit: www.embraco.com
The Heart Of Cold: Importance Of The Compressor Relay
Think of the compressor relay as the unsung hero in your refrigerator. This vital component acts like a messenger. It tells the compressor when to turn on or off. Without it, the appliance cannot maintain the cold environment needed to keep food fresh. Understanding its role is crucial for a well-functioning fridge.
Role In Refrigeration Cycle
- The relay provides power to the compressor.
- It helps start and stop the compressor efficiently.
- A relay in good condition ensures optimal refrigeration.
Without a functioning relay, the compressor might not run. The refrigerator will fail to cool. Keeping perishables fresh becomes nearly impossible. Testing the relay can avert potential disruptions.
Symptoms Of A Faulty Relay
Identifying a bad relay can save time and money. Look out for these signs:
| Sign | Description |
|---|---|
| Strange Noises | Clicking sounds when the fridge is turning on or off. |
| Not Starting | Fridge fails to start, and food starts to spoil. |
| Overheating | The compressor gets too hot to touch. |
| Erratic Cooling | Temperatures fluctuate, not stable. |
Spotting these early warnings prompts timely checks. It avoids more significant issues such as complete food loss or hefty repair costs. Proactivity with appliance maintenance is key.
Safety First: Preparation Steps
Before diving into the task of testing your refrigerator compressor relay, it’s critical to prioritize your safety. Proper preparation is a must to avoid any accidents. This guide will lead you through key safety steps. So, let’s gear up with the right approach to ensure a smooth and safe troubleshooting experience.
Disconnecting Power
Unplugging your refrigerator is the first step. This action prevents electrical shocks. Locate the power cord behind the fridge. Gently pull it out from the power outlet. Confirm that no power flows to your appliance. You can do this by checking lights or sounds coming from the fridge.
Gathering Necessary Tools
- A multimeter reads electrical currents.
- Screwdrivers help open the panel.
- Gloves and safety goggles protect your hands and eyes.
Ensure these tools are within reach to streamline your workflow. With protection and tools ready, you can proceed with testing the compressor relay safely.
Locating The Relay: Identifying Your Target
Ever wondered what helps kickstart your refrigerator’s compressor? The secret lies with a small but mighty component – the compressor relay. Like a diligent orchestra conductor, it signals the compressor to start or stop, keeping your fridge humming and your food fresh. If your refrigerator falters, testing the relay becomes critical. Don’t worry! This guide will light your path, easing you into this task with ease. Let’s locate and identify this unsung hero.
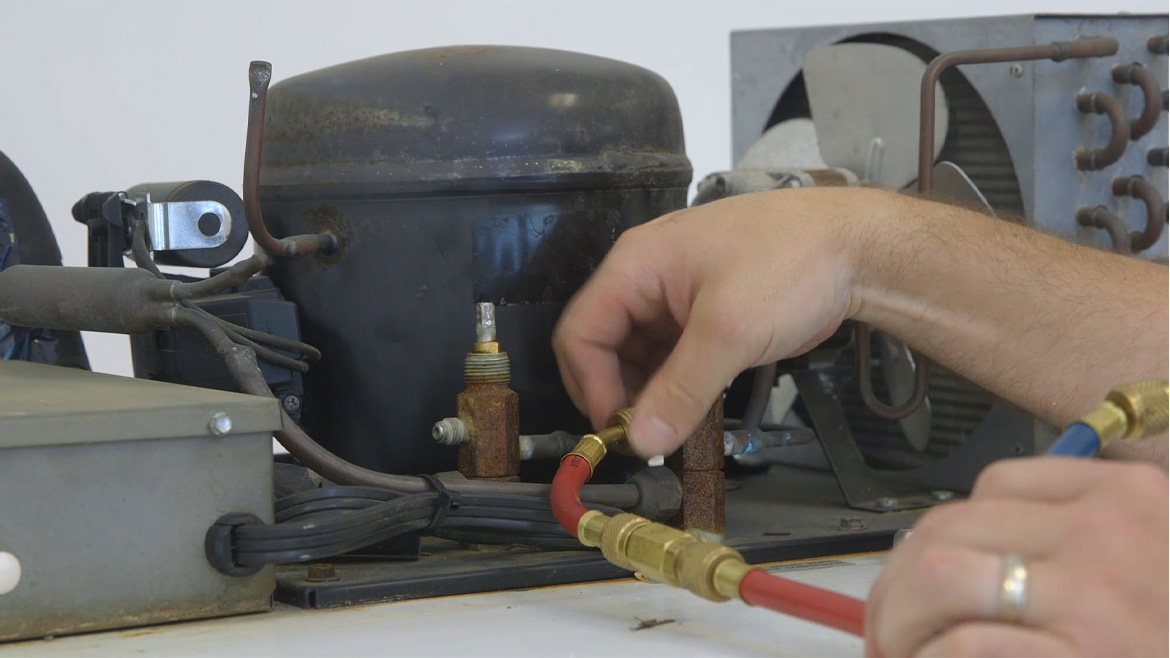
Accessing The Compressor Compartment
To begin, unplug your refrigerator to ensure safety. Next, navigate to the back. There, you will find a panel, usually secured with screws or clips. Once removed, a world behind the fridge unveils. You’ll see different parts here. Look for the compressor. It’s cylindrical, often black, and sizeable. The relay is close to this vital part. Some models may have it mounted on the side, while others nest it at the compressor’s base.
Recognizing The Relay Components
Your relay might look like a tiny box or a capsule, often with a plastic housing. Wires lead to this humble device, indicating its pivotal role.
- Wiring: Color-coded wires plug into the relay. Trace them back from the compressor.
- Shape: Relays can be rectangular or round, but always compact.
- Connectors: Metal protrusions or prongs, usually two to three, offer places for wires to connect.
Relays vary from fridge to fridge. Check your manual. It will have a diagram with your relay’s location and look. Taking a photo with your phone helps during reassembly.
Credit: www.achrnews.com
Removal Made Easy: Detaching The Relay
When a refrigerator begins to fail, the compressor relay often needs inspection. This piece is vital for the appliance’s function. Luckily, the process is straightforward. You can do it with basic tools.
Unplugging The Relay
Locating your relay will be your first task. Find it at the back of your fridge. Access it by removing the rear panel.
- Switch off the refrigerator.
- Unplug it from the power source.
- Move the unit to access the back.
- Use a screwdriver to take off the panel.
With these steps, you can reach the compressor and its relay.
Safety Checks Before Handling
Safety first is your motto here. Before touching the relay, do a quick check.
- Confirm the power is off.
- Wear gloves to protect hands.
- Use eye protection.
Ready to proceed? Great.
| Step | Action |
|---|---|
| 1 | Spot the relay on the compressor. |
| 2 | Use pliers to pull off the relay. |
| 3 | Detach any wires gently. |
| 4 | Keep all parts secure for testing. |
By following these steps, you’ll have the relay out in no time. Ready for testing or replacement.
A Methodical Approach: Testing The Relay
Is your refrigerator not cooling as it should? The issue might be with the compressor relay. This small device helps start the compressor. Before you call a professional, you can test the relay yourself. It’s easy and saves money. This guide shows you how to check the compressor relay using a multimeter, and what the results mean.
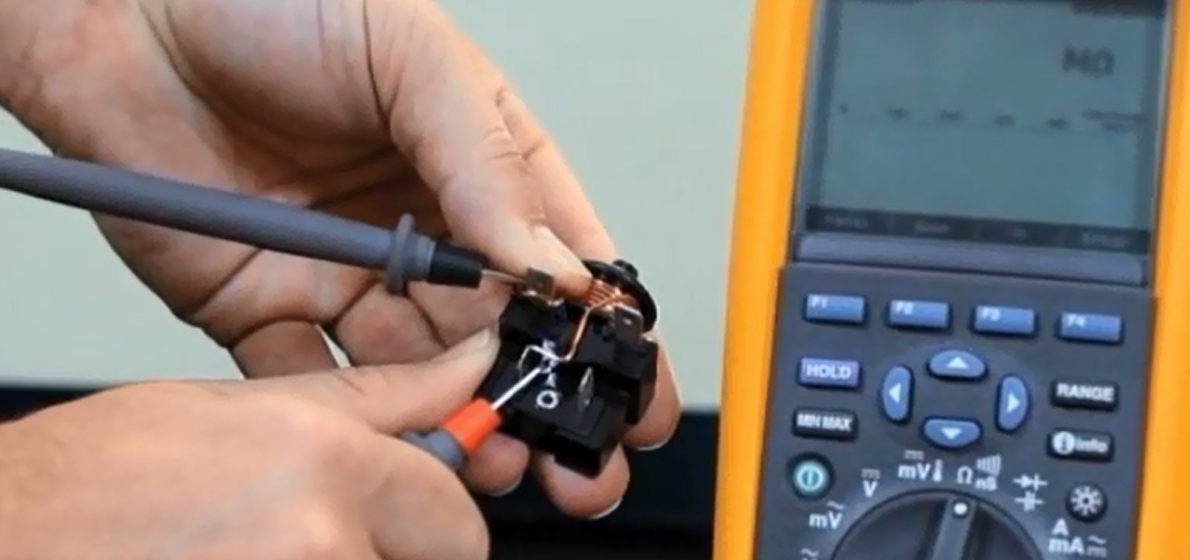
Using A Multimeter
To start the process, safety comes first. Unplug the fridge. Remove the relay from the compressor. You will find the relay at the back, secured by a clip or screws. Once removed, grab your multimeter. Place it on the ohms setting.
- Locate the relay’s start and run terminals.
- Set your multimeter to the ohms setting. It measures resistance.
- Hold one probe to the start terminal and one to the run terminal.
- Note the reading on your multimeter.
Most relays should show low resistance. A value generally between 3 to 10 ohms. This step is crucial. A correct reading means the circuit within the relay is good.
Next, check the relay for continuity. This step ensures the electrical path is clear.
- Keep the multimeter set to the ohms setting.
- Test between each terminal and the relay body.
- You should not get any reading here.
If there’s continuity, it’s bad news. The relay might be faulty. It could cause a short circuit in your fridge.
Remember to check from all angles. Touch each terminal and the relay housing. Be thorough.
Interpreting The Results
Understanding the multimeter readings determines your next steps. The readings can tell you if the relay is good or bad.
| Test | Expected Result | Meaning |
|---|---|---|
| Resistance | 3-10 ohms | Good circuit |
| Continuity | No reading | No short circuit |
Interpreting the multimeter data is simple. Low resistance means the relay’s internal circuit is intact. No continuity with the housing means no dangerous shorts.
If the readings differ, the relay might be defective. Inconsistent readings suggest an internal issue. This relay won’t start your compressor properly.
After interpreting the results, decide the next steps. If testing points to a faulty relay, consider replacing it. A new relay could bring your fridge back to life. But if you’re unsure at any point, contact a professional.
By methodically testing the relay, you can find and fix your fridge problem with ease.
Deciphering Results: When To Replace
If your fridge has stopped cooling efficiently, the compressor relay might be the culprit. Understanding the test results is key. It’s vital to know when a relay requires replacement to get your refrigerator running smoothly again. Let’s walk through analyzing test readings and identifying signs of a faulty relay.
Analyzing Test Readings
Performing the multimeter test on the refrigerator compressor relay yields crucial data. A healthy relay will show continuity, indicating a functional electrical path.
- If the reading shows zero or near-zero resistance, the relay is typically in good working order.
- A high resistance reading may signal an issue. This reading suggests the electrical current is not passing effectively through the relay.
- When no continuity is detected, it points to a broken pathway. This is a clear sign that the relay might need replacement.
Signs Of A Defective Relay
Aside from test readings, other symptoms point to a faulty relay. Pay attention to these signs:
- Odd noises such as clicking or humming from the fridge when the compressor starts up.
- Your refrigerator starts and stops more frequently than usual.
- The compressor struggles to start, causing the fridge to not cool effectively.
- The presence of a burnt smell near the compressor, indicating potential electrical issues.
- Overheating of the relay itself is a direct indication of failure.
After identifying these signs, consider the age and condition of the relay. If the relay is old or shows any of the above symptoms, replacing it could restore your refrigerator’s functionality.
A properly functioning relay helps maintain the refrigerator’s efficiency. Timely replacement of a failing relay is cost-effective compared to major compressor repairs.
Installation Simplified: Fitting A New Relay
Your refrigerator is the heart of your kitchen. But sometimes, it stops cooling efficiently.
A faulty compressor relay might be the culprit. Replacing it sounds complicated. Don’t worry! We’ll simplify it for you.
Choosing The Correct Relay Replacement
First, get the right relay. Check your fridge model number.
It’s usually found inside the refrigerator or on the back. Your user manual can also help.
- Match the specifications with your old relay.
- Buy from a reputable brand to ensure longevity.
- Consult a professional if unsure about the match.
Steps To Securely Install New Relay
With the correct relay in hand, installation can begin.
Turn off your refrigerator to ensure safety.
- Unplug the fridge from the wall.
- Remove the back panel to access the compressor area.
- Take out the old relay. Note how it fits.
- Position the new relay exactly as the old one was.
- Connect the wires following the diagram provided.
- Snap or screw the relay in place, securing it.
- Replace the back panel of the refrigerator.
- Plug in the fridge and listen for the compressor to start.
Sometimes, you’ll hear a click. That means the compressor is functioning.
Finally, ensure your refrigerator begins to cool before you restock it.
Final Checks: Ensuring A Successful Repair
The success of a compressor relay repair lies in meticulous final checks. Proper reassembly and post-repair testing safeguard your refrigerator’s operation.
Reassembling the UnitReassembling The Unit
Follow these steps to put your refrigerator back together:
- Replace the relay on the compressor’s side.
- Secure the relay with its retention clip or screws.
- Reconnect power wires to their respective terminals.
- Fit together the protective cover.
- Ensure all components are firmly in place.
Post-repair Testing
Perform these tests to confirm a successful repair:
- Plug in the refrigerator.
- Listen for the compressor to start.
- Check if the fridge cools over several hours.
- Monitor for consistent temperatures.
If the fridge operates as expected, the repair is successful.

Credit: www.youtube.com
Frequently Asked Questions Of How To Test A Refrigerator Compressor Relay
What Is A Refrigerator Compressor Relay?
A refrigerator compressor relay is an electrical component that starts and runs the compressor. It acts as a switch to power the compressor, initiating the refrigeration cycle.
How Can I Diagnose A Faulty Relay?
To diagnose a faulty relay, listen for unusual clicking sounds or observe if the refrigerator fails to cool. Use a multimeter to test for continuity. No continuity indicates a problem.
What Tools Are Needed To Test A Relay?
Testing a relay requires a multimeter and safety gloves. Ensure the refrigerator is unplugged before attempting any tests to avoid electrical shock.
Can I Replace The Relay Myself?
Yes, you can replace the relay yourself with basic tools. Follow the refrigerator’s manual and always disconnect the power before attempting to replace the relay.
Conclusion
Testing your refrigerator compressor relay ensures the heart of your fridge stays healthy. By following the steps outlined, you’ve learned a vital skill in appliance maintenance. Don’t hesitate to consult a professional if you’re uncertain. Remember, a well-performing relay means a longer-lasting refrigerator.
Keep your food fresh and your kitchen running smoothly!