
To replace the light in a Whirlpool refrigerator, first disconnect the appliance’s power. Then, remove the light cover and replace the old bulb with a compatible new one.
Navigating home appliance maintenance like changing a light bulb in your Whirlpool refrigerator can seem daunting, but it’s a straightforward task that requires minimal tools. A well-functioning fridge light is essential for finding items quickly, especially in the dark. It reduces energy wastage as you spend less time with the door open.
The right lighting ensures your refrigerator interior looks clean and inviting, maintaining the appliance’s appearance and functionality. This simple DIY improvement not only brightens the inside of your fridge but also embodies the everyday homeowner’s ability to manage their appliances efficiently. Replacing the refrigerator light promptly ensures a seamless kitchen experience, free from the minor irritations of a dimly lit space.
Introduction To Appliance Maintenance
Keeping appliances in tip-top shape is critical for every homeowner. Regular maintenance extends the life and efficiency of your appliances. One common household task is replacing the light in your refrigerator. This guide will walk you through the steps to identify when a light needs replacement and how to do it yourself effectively, saving costs and enhancing your appliance repair skills.
Common Signs Your Refrigerator Light Needs Replacement
Look out for these signs indicating it’s time for a new light:
- Flickering or intermittent light even after firmly closing the door.
- Light bulb fails to turn on when opening the fridge.
- Visible damage to the bulb or socket.
Benefits Of Diy Appliance Repair
Handling simple repairs on your own has many advantages:
- It saves money on service fees.
- Immediate resolution avoids waiting for a professional.
- Builds skill and confidence in DIY tasks around the home.
Identifying The Right Replacement Bulb
Identifying the Right Replacement Bulb for your Whirlpool refrigerator doesn’t have to be a shot in the dark. Your fridge’s light is a small, yet crucial feature that helps you find snacks and ingredients effortlessly. But when it burns out, you’ll want to replace it quickly and correctly. Choosing the appropriate bulb ensures longevity and efficiency.
Types Of Refrigerator Bulbs
Various bulbs light up modern refrigerators like yours. Before running to the store, know the types:
- LED: Offers long life and energy efficiency.
- Incandescent: Traditional, easy to find, but less efficient.
- Halogen: Bright, with a more natural light.
Finding Your Whirlpool Model’s Bulb Specs
Your Whirlpool model has a specific bulb type that you should use. Here’s how to find the specs:
- Check the manual. It lists the exact bulb for your model.
- Look inside the fridge. A sticker or plate may list bulb details.
- Visit Whirlpool’s website. Enter your model number for bulb info.
Safety First: Precautions Before You Start
Working with electrical appliances can be risky without the right steps. Your safety is the priority when replacing a light in a Whirlpool refrigerator. Let’s ensure you’re ready for a safe repair.
Disconnecting Power
Always unplug your refrigerator first. This avoids shock and keeps you safe. Pull the plug from the wall outlet. Confirm the power is off. A simple test is to check if the fridge light or display is off.
Tools And Protective Gear
Gather your tools and wear protective gear. Here’s what you might need:
- Screwdrivers – for unscrewing light covers
- Gloves – to protect your hands from sharp edges
- Goggles – to keep your eyes safe from debris
With these items, you reduce the risk of injury.

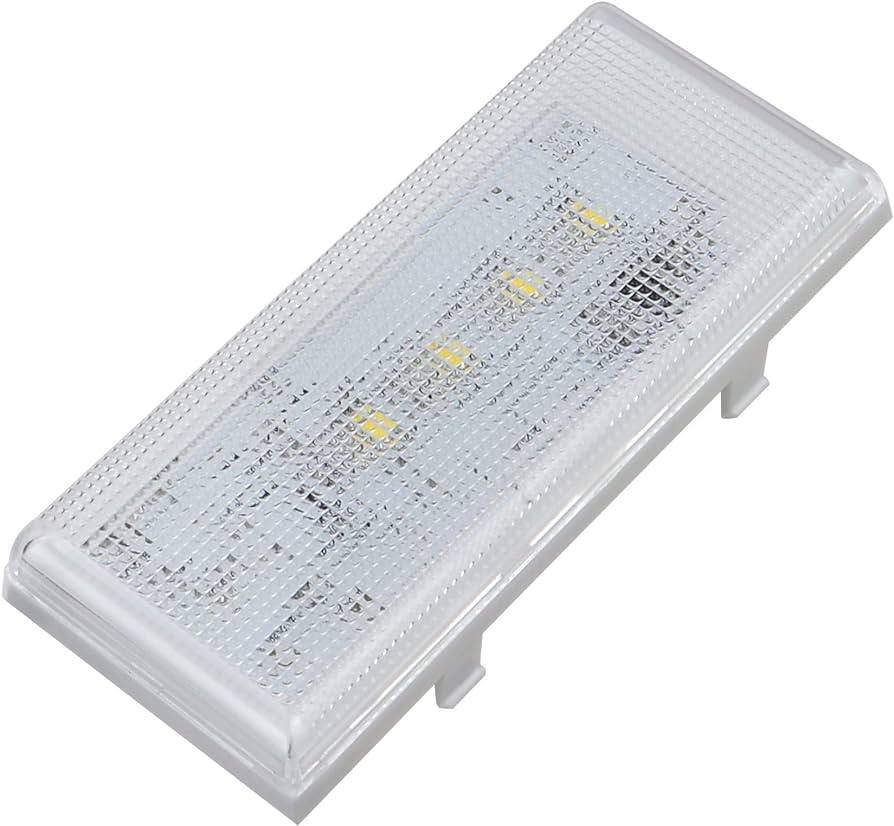
Credit: www.facebook.com
Step-by-step Guide To Replacing The Light
Is your Whirlpool refrigerator lightbulb flickering or dead? It’s time to replace it and bring the light back to your fridge! Here is a quick and easy guide to make the replacement process smooth and safe.
Accessing the Light CompartmentAccessing The Light Compartment
First, ensure your refrigerator is unplugged. Find the light cover in the fridge. This is usually at the top or back. Use a flathead screwdriver to gently pop the cover off. Take care not to crack the cover.
Removing the Old BulbRemoving The Old Bulb
Once you have access, unscrew the old bulb. Turn it counter-clockwise until it comes free. Some models may have a push-and-twist mechanism. Check your Whirlpool manual for specifics.
Installing the New BulbInstalling The New Bulb
- Obtain the correct bulb with the same size and wattage as the original.
- With clean hands, screw the new bulb into place. Turn it clockwise until it’s secure.
- Replace the light cover. Make sure it snaps back into place.
- Plug your refrigerator back in. Open the door to check the new light.
Troubleshooting Common Issues
Replacing a light bulb in your Whirlpool refrigerator should be straightforward. But sometimes, you might encounter a few hiccups. This section helps you to iron out those small issues and ensures your appliance is back to its bright and functional self in no time.
When The New Bulb Doesn’t Work
Replaced the bulb and still in the dark? Don’t worry. Go step by step:
- First, ensure the bulb is the right type and wattage for your model.
- Next, check your refrigerator’s manual for any specific instructions.
- Examine the socket for any damage or corrosion.
- Check if the refrigerator door switch isn’t stuck.
- If all seems well, the issue might be with the electrical connection. Consider a professional’s help.
Addressing Flickering Lights
Flickering lights can be annoying. Let’s fix that:
- Confirm the bulb is screwed in tightly.
- Ensure there are no power surges affecting your home.
- If the light continues to flicker, think about replacing it with a fresh one.
- Check the control board. A faulty board may need professional attention.
Credit: www.kitchenaid.com
Testing The New Light
After installing a new light in a Whirlpool refrigerator, testing is key. This step ensures everything is working correctly. Let’s walk through how to confirm the light operates as it should.
Ensuring Proper Functionality
Check the light’s response when the fridge door opens. Look for a steady glow that illuminates the interior. It’s simple:
- Open the refrigerator door.
- Watch for the light to turn on.
- Close and reopen the door if needed.
If the light works, the job is done. Your fridge is back to normal.
What To Do If The Light Still Won’t Turn On
Sometimes, the new light may not work. Here’s a quick checklist:
- Double-check the bulb – Make sure it’s the correct type.
- Inspect the socket – Look for damage or loose wires.
- Test the switch – The door switch might be faulty.
- Consult the manual – It may have troubleshooting tips.
No luck yet? It might be time to get help from a professional.
Tips For Prolonging Bulb Life
Keeping the light in your Whirlpool refrigerator glowing longer is simple with the right tricks. Here’s how you can ensure your fridge bulb shines bright for more meals to come.
Optimal Refrigerator Usage
Correct use of your fridge prevents bulb burnout. Keep these guidelines in mind:
- Avoid frequent door openings.
- Check if door seals tightly.
- Set temperature to manufacturer’s recommendation.
- Let hot food cool before storing.
- Organize space well for quick access.
Effective Cleaning Practices
Keep the bulb and its surroundings clean:
| Task | Frequency | Method |
|---|---|---|
| Wipe Bulb | Monthly | Gently with dry cloth |
| Clean Socket | Biyearly | Damp cloth, then dry |
| Check Connections | Annually | Ensure snug fit |
Remember to target dust and grime, and never clean while the bulb is hot.
When To Call A Professional
When to Call a Professional: Replacing the light in your Whirlpool refrigerator can often be a simple DIY task. Sometimes, though, the issue goes beyond just replacing a bulb, and that’s when a professional should step in. Situations such as complex electrical issues or warranty considerations require expert intervention to avoid further damage or voiding your warranty. Let’s look at two scenarios where calling a professional is the best course of action.
Complex Electrical Issues
Electrical problems can be tricky and dangerous. If after replacing the bulb, the light still doesn’t work, or if there are visible signs of wiring problems, it’s time for a pro. These issues require a skilled technician:
- Flickering lights even after bulb replacement.
- Discolored wires or burn marks on the socket indicating a short circuit.
- No power to the light socket even when the fridge is running.
In complex cases, an expert has the right tools and safety know-how to fix these problems without risk.
Warranty Considerations
Your refrigerator comes with a manual that details the warranty terms. If it’s still under warranty, service is best left to authorized technicians. Unauthorized repairs could void your warranty:
| Do It Yourself | Warranty Status |
|---|---|
| Simple bulb replacement | Usually safe |
| Invasive repairs | Could void warranty |
| Replacement with non-original parts | Often voids warranty |
Always check your warranty and consult the manual before attempting repairs or call the Whirlpool support line for advice.
Final Thoughts And Maintenance Advice
Proper maintenance extends the life of your Whirlpool refrigerator. Routine checks ensure lights function and appliances run efficiently.
Creating A Regular Maintenance Schedule
Maintaining a regular schedule helps to keep your refrigerator in top condition. Note essential tasks:
- Monthly cleaning of the interior and gaskets
- Checking and replacing lights every six months
- Annual condenser coil dusting
Mark calendar reminders to not forget these important dates.
Learning More About Your Whirlpool Appliance
Understanding your refrigerator enhances maintenance proficiency:
| Model | Light Type | Replacement Frequency |
|---|---|---|
| WRS321SDHZ | LED | Every 3-5 years |
| WRX735SDHZ | Incandescent | Every 2 years |
Consult the user manual or visit the Whirlpool website for specific details.
With these tips, you can assure a well-functioning refrigerator with bright lights for years. Regular maintenance is key. Learn specifics about your appliance to tackle maintenance with confidence.

Credit: www.amazon.com
Frequently Asked Questions For How To Replace Light In Whirlpool Refrigerator
How Do I Change The Lightbulb In My Whirlpool Refrigerator?
Turn off your refrigerator. Remove the light cover by pressing the tabs. Unscrew the old bulb. Screw in a new appliance bulb. Replace the cover. Turn on the refrigerator.
How Do I Change The Interior Lights On My Whirlpool Refrigerator?
Turn off your Whirlpool refrigerator. Remove the light cover by pressing the tabs. Unscrew the old bulb. Replace with a new appliance bulb. Reattach the cover. Turn the fridge on.
How Do You Remove A Refrigerator Light Cover?
Turn off the fridge. Gently press the light cover tabs or screws. Ease the cover down. Disconnect any clips or connectors. Remove the cover carefully.
Why Are The Lights In My Whirlpool Refrigerator Not Working?
Your Whirlpool refrigerator lights may not work due to a burnt-out bulb, a faulty light switch, or a power issue. Check and replace the bulb, ensure the light switch functions properly, or investigate for any power supply problems.
Conclusion
Replacing the light in your Whirlpool refrigerator doesn’t have to be a daunting task. With clear steps and the right tools on hand, you’ll have your fridge lighting up like new in no time. Remember, safety is paramount; always unplug your appliance first.
By following this guide, you can save time and avoid the cost of a professional repair. Keep your Whirlpool refrigerator in top form and let it shine bright with a fresh light.