
To remove the ice bin from a Whirlpool refrigerator, first, ensure the ice maker is off and then gently lift the bin upward and out. Next, release any latches or buttons if present.
Navigating the upkeep of your Whirlpool refrigerator can sometimes require removing the ice bin—perhaps for cleaning, defrosting, or troubleshooting a stubborn ice dispenser. Dealing with appliances should be straightforward, and understanding how to handle the ice bin is no exception.
It’s essential, especially since regular maintenance can prevent potential damages and extend the appliance’s longevity. By keeping these tasks simple, homeowners can save time and avoid the hassle of complicated procedures. The goal is to help you manage your Whirlpool refrigerator effectively without the need for a professional every time a minor adjustment is needed. With this guide, tackling kitchen appliance maintenance becomes hassle-free, promoting efficiency in your home routine.
Before You Begin: Preparing To Remove The Ice Bin
Removing the ice bin from your Whirlpool refrigerator is a straightforward process. Proper preparation ensures a smooth and safe removal. Follow these simple guidelines to get ready.
Safety First: Unplugging The Refrigerator
Before touching the ice bin, it’s vital to unhook your refrigerator from its power source. This prevents any electrical hazards or malfunctions. Open the door and locate the power cord. Gently remove it from the socket. Confirm the lights and display are off. Now, safely proceed to the next step.
Gathering Necessary Tools
Although Whirlpool ice bins are often designed for easy removal, sometimes a few tools help. Prepare the following items:
- Gloves to improve grip.
- Towel to catch any melting ice.
- For certain models, a screwdriver may be needed.
Double-check your refrigerator model guide. It describes if you need tools or just your hands. Save time by having everything you need within reach before beginning.
Identifying Your Whirlpool Model
Getting ready to remove the ice bin from your Whirlpool refrigerator requires a specific approach based on your model. Identifying your refrigerator’s model is the first crucial step to ensure you follow the right instructions and avoid any damage. Let’s find out how to locate your model number and understand why it’s essential.
Locating The Model Number
Your Whirlpool refrigerator’s model number is like its unique fingerprint. It tells you everything about the appliance’s specific features and design. To find it, open your refrigerator and look for a label or sticker. This could be on the inside wall, on the ceiling, behind the crisper, or on the door jamb. The model number will be a combination of letters and numbers. Write it down once you find it.
Why Model Type Matters
Different Whirlpool refrigerator models have diverse designs and components. The way you remove the ice bin in a side-by-side model differs from the method used for a bottom freezer. Knowing your model number allows you to access the correct manual and follow manufacturer-recommended procedures. This can prevent damage or the voiding of your warranty.
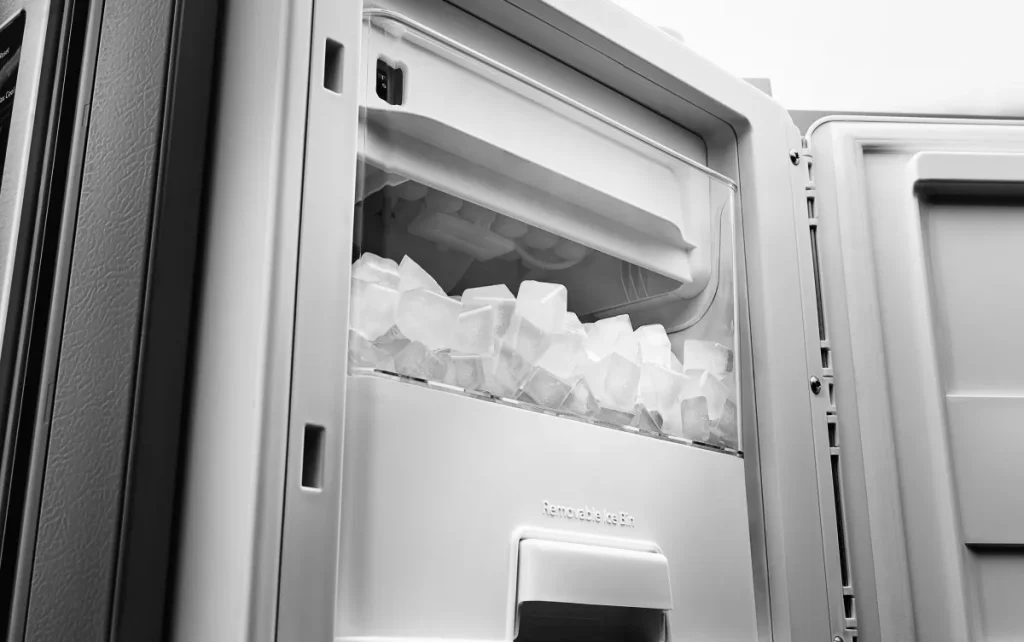
Step-by-step Removal Process
The step-by-step removal process of the ice bin from a Whirlpool refrigerator is simple and straightforward. Whirlpool designs its appliances with ease of use in mind, making maintenance tasks hassle-free. To begin the ice bin removal, a proper understanding of the freezer’s internal setup is necessary. Grab your gloves, and let’s get started with this user-friendly guide.
Opening The Freezer And Accessing The Ice Bin
Start by opening the freezer. Pull the handle to expose the ice bin. The location of the bin depends on your model. It might be on the top, bottom, or side. Bright lighting helps. Clear the area around the bin. Make sure no food items block the path. A clear workspace is key for the next steps.
Releasing Lock Mechanisms Or Latches
Locate the release mechanism on your ice bin. Some models feature a latch or button. Press or lift it gently. For bins with a locking arm, raise the arm to the off position. The bin should now detach from the freezer unit.
Use both hands for balance. Pull the bin straight out. Avoid tipping or shaking. This prevents ice spillage. The bin should slide out smoothly if you’ve released all locks correctly. If not, check for additional latches.
Once out, set the bin on a flat surface. Empty the ice if necessary. You’re now ready for cleaning or troubleshooting the bin or freezer unit.

Credit: www.ebay.com
Troubleshooting Common Complications
Working with a Whirlpool refrigerator can sometimes lead to ice bin removal issues. Don’t worry. With some smart steps, you can solve these problems easily. Here’s how to troubleshoot common complications when removing the ice bin from your Whirlpool refrigerator.
Dealing With A Stuck Ice Bin
Ice bins that refuse to budge can be frustrating. Take a deep breath and follow these tips:
- Power off your refrigerator to ensure safety.
- Empty the ice bin to reduce weight and potential blockages.
- Warm hands or gloves can help grip the bin firmly.
- Gently wiggle the bin side to side to loosen.
- If resistance persists, check for a release button or lever.
- Press the mechanism while pulling the bin out smoothly.
If the ice bin remains stuck, it may need defrosting. Wrap towels around the area to catch meltwater. Use a hairdryer set on low, keeping it moving to avoid damaging the plastic.
When Ice Blocks The Removal Path
Ice accumulation is a common obstacle. To clear the path:
- Switch your refrigerator to off mode.
- Remove any visible ice clumps by hand.
- For stubborn ice, apply warm cloths to melt it away.
- Use a plastic scraper, never metal, to chip away at the ice.
- Avoid force which might crack the bin.
- Once cleared, slide the bin out gently.
Maintain a regular cleaning schedule for your ice maker to prevent future blockages. A clean ice path means fewer headaches and uninterrupted ice.
Maintenance Tips For Your Ice Bin
Keeping the ice bin in top shape extends its life. Follow these simple steps to ensure your ice stays clean and flows freely.
Cleaning The Ice Bin Properly
Regular cleaning is key. Remove the bin following the manufacturer’s guidance. Empty it and use warm soapy water to clean. Rinse thoroughly with clean water. Dry with a soft cloth before reinstalling. Do this every month for best results. Use a mixture of vinegar and water for a deep clean. This natural solution removes stubborn stains and smells.
- Detach and empty the ice bin.
- Clean with warm, soapy water.
- Rinse well and dry with a cloth.
- For tough stains, use vinegar and water.
Preventing Ice Clumping
Avoid annoying ice clumps. They block dispensers and make it hard to get ice. To prevent this:
- Use ice regularly to keep it fresh.
- Ensure the freezer temperature is right. It should not exceed 0°F (-18°C).
- Check the bin’s seal. It keeps warm air out.
- Don’t overfill the bin. It needs airflow.
Maintain a schedule for bin maintenance. It maximizes performance and hygiene. Fresh, clean ice is always at hand with these practices.

Credit: www.amazon.com
Reinstalling The Ice Bin
Now that the ice bin is out, let’s put it back in place. Follow these steps to ensure a perfect fit and smooth operation. Take care to align and connect everything correctly for your Whirlpool refrigerator.
Aligning The Bin With The Tracks Or Guides
Put the ice bin back properly to avoid jams. Let’s align it with the tracks:
- Lift the bin gently towards the tracks.
- Slide the bin carefully into place.
- Make sure it’s straight and level.
- Look for telltale clicks or signs that it’s secure.
Ensuring The Ice Maker Connects Correctly
Getting the connection right is key. A good connection means your ice maker works well. Here’s how to do it:
- Check the coupling on the back of the bin.
- Ensure it fits into the ice maker.
- Listen for a sound that it’s connected.
- Test by making ice.
Double-check these steps to be sure. Your ice maker should now be ready for action. Enjoy the convenience of having ice at your fingertips!
Addressing Issues Post Removal
Sometimes, after you remove your ice bin from the Whirlpool refrigerator, you might come across a few hiccups. No need to worry! We’ll guide you through potential problems and their straightforward solutions. Let’s keep your ice maker running smoothly with these helpful troubleshooting tips.
Ice Maker Not Working After Reinstallation
Even after you put the ice bin back, the ice maker might not work right away. Here’s what you can do:
- Check that the ice maker is properly connected.
- Inspect the bin to ensure it’s placed correctly.
- Give the refrigerator time to reset.
- Look for any obstructions or frozen chunks.
- Ensure the ice maker control arm is not stuck or off position.
Try these steps and give it some time. If it’s still a no-go, you may need a technician’s help.
Water Leakage And Other Potential Problems
Sometimes, after the bin comes out, you might notice water pooling or other issues:
- Double-check the seals: Ensure all gaskets are secure.
- Water line inspection: Look for kinks or leaks in the lines.
- Drain pan check: It might be full or misaligned.
- Look over the filter: A clogged filter can lead to problems.
If the leakage persists, consider reaching out to Whirlpool support or a professional.
Professional Help And Support
Struggling with your Whirlpool refrigerator’s ice bin can be frustrating. Fear not, as expert help is at your fingertips! Should you require extra assistance, Whirlpool provides professional customer service with a smile. They make your appliance worries melt away like ice on a sunny day!
When To Contact Customer Service
There are several instances when reaching out to Whirlpool Customer Service is wise:
- Your ice bin is stuck and you’ve followed all the DIY steps.
- You notice unusual noises during ice removal.
- The ice bin components seem damaged or broken.
- Technical concerns stretch beyond simple ice bin removal.
Remember, help is just a call or click away!
Warranty And Repair Information
Before you dial for help, it’s essential to understand your refrigerator’s warranty status. Check these points:
| Warranty Status | Action |
|---|---|
| Under Warranty | Repairs or replacements may be covered at no extra cost. |
| Out of Warranty | Consider paid services or guidance for DIY fixes. |
To confirm your warranty or request repairs, contact Whirlpool Support. They will guide you through the process swiftly.
Credit: www.whirlpool.com
Frequently Asked Questions For How To Remove Ice Bin From Whirlpool Refrigerator
How Do You Remove The Ice Box From A Whirlpool Refrigerator?
To remove an ice box from a Whirlpool refrigerator, first turn off the ice maker. Pull out the ice bin, then lift to unhook it from the tracks. Lastly, gently remove it from the compartment.
How Do You Remove A Stuck Ice Bin?
To remove a stuck ice bin, gently wiggle it while pulling straight out. Defrost any ice buildup with warm water if necessary. Always switch off the refrigerator beforehand to ensure safety.
How Do I Clean My Whirlpool Ice Bin?
To clean your Whirlpool ice bin, first remove it from the freezer. Discard old ice and wash the bin with warm, soapy water. Rinse it thoroughly and dry before reinstalling.
How Do You Remove An Ice Bucket From A Freezer?
To remove an ice bucket from a freezer, gently wiggle it to break any ice seals. Tilt it slightly and pull it straight out. If it’s stuck, defrost briefly by dabbing with a warm cloth. Avoid forceful pulling to prevent damage.
Conclusion
Wrapping up, your Whirlpool refrigerator’s ice bin removal is straightforward with the right steps. Always prioritize safety and consult your manual for specifics. Tackling this task independently not only saves time but enhances your appliance care know-how. For more practical home maintenance tips, keep following our blog.