
To remove the freezer drawer on a Whirlpool French Door Refrigerator, first extend the drawer fully and lift it off the slides. Ensure the rails remain inside the freezer while you detach the drawer.
Removing a freezer drawer from your Whirlpool French Door Refrigerator is often necessary for a thorough cleaning or maintenance. Whether you’re dealing with a build-up of ice, cleaning spills, or simply trying to organize your freezer space more effectively, taking out the drawer is a straightforward task.
Although the process might sound daunting, it’s actually quite simple and can be done quickly with a bit of care. Homeowners looking to perform this task themselves will find that it saves time and potentially costly service fees. With the proper instructions, anyone can safely and efficiently handle this aspect of refrigerator upkeep, ensuring that the appliance continues to function optimally and remains clean and hygienic for storing food.
Safety First
Embarking on any appliance-related task demands a ‘Safety First’ approach. When removing a freezer drawer, this principle is essential to avoid accidents and damage to your Whirlpool French Door Refrigerator. Careful preparation can ensure a smooth and safe process.
Powering Down the RefrigeratorPowering Down The Refrigerator
Before touching any parts, power down the refrigerator to ensure safety. This can prevent electrical hazards and potential damage. Reach behind the fridge to unplug it, or switch off the breaker controlling the refrigerator circuit.
Gathering Necessary ToolsGathering Necessary Tools
To remove the freezer drawer efficiently, gather the right tools. You’ll need:
- Screwdriver: Usually a Philips or flat-head, depending on the screws.
- Work gloves: Wear these to protect your hands and ensure a good grip.
- Towel or mat: Place this on the floor to protect it from scratches and scuffs.

Credit: www.whirlpool.com
Initial Preparation
Before diving into the task of removing the freezer drawer on your Whirlpool French Door Refrigerator, it’s crucial to carry out some initial preparation. These steps will ensure a smooth and safe process. Let’s take a closer look at what needs to be done.
Emptying The Freezer Drawer
Start by powering off your refrigerator to ensure safety. Next, empty the freezer drawer. Remove all items including ice from the bin. Place perishable items in a cooler to keep them frozen.
Clearing Space For Movement
With the drawer emptied, ensure you have adequate space to work. Move obstacles out of the way to provide easy access. Clearing space prevents accidents and damage during removal.
| Quick Checklist Before Removal | |
|---|---|
| Power Off | Ensure the refrigerator is not running. |
| Empty Contents | Remove all food and ice trays. |
| Clear Space | Make room to safely pull out the drawer. |
Understanding The Mechanism
Understanding the Mechanism behind the removal of a freezer drawer in a Whirlpool French Door Refrigerator is straightforward. It is essential to familiarize ourselves with the specific parts and how they work together. This knowledge makes the process smooth and risk-free, preventing damage to the appliance. Let’s dive into the individual elements and comprehend their roles in the structure of your refrigerator.
Identifying Drawer Components
Start by understanding the basic components of the freezer drawer:
- Glide Rails: These allow the drawer to slide out smoothly.
- Mounting Brackets: They hold the drawer in place.
- Drawer Box: This is the main container that holds your frozen food items.
- Handles: Used to pull the drawer open or closed.
- Drawer Bins: Smaller compartments within the drawer for organization.
- End Caps: They protect the edges of the glide rails.
Mechanical Connections And Levers
The freezer drawer operates through a series of mechanical connections and levers:
- Release Mechanism: Often a trigger or button that disengages the drawer from the slide mechanism.
- Lift-and-Pull Method: The common method to remove the drawer after the release is activated.
- Locking Tabs: These may need to be pressed or moved to release the drawer.
With the correct identification of components and understanding of the mechanical connections, the process becomes safe and easy. Familiarize yourself with these parts before attempting to remove your freezer drawer.

Credit: www.kitchenaid.com
Starting The Removal Process
Today’s focus is on how to remove the freezer drawer on a Whirlpool French Door Refrigerator. Starting this task might seem daunting at first. But with the right steps, it’s quite simple. Let’s get into the initial phase of removal.
Releasing Upper Drawer
Before removing the freezer drawer, ensure the fridge is unplugged. Safety always comes first. Pull the drawer out to its full extension.
- Locate the screws on the sides.
- Use a Phillips screwdriver to remove them.
- Hold the drawer firmly as it becomes loose.
Lift the drawer gently upwards and outwards. It should come off the glides smoothly.
Adjusting Drawer Glides
With the upper drawer out, you can now adjust the glides.
- Find the plastic locking tabs on each side inside the rails.
- Press these tabs simultaneously. You may need a friend to help.
- Slide both glides back into the freezer compartment.
Be gentle to avoid damaging the glides. This will ensure a seamless reinstallation later.
Detaching The Drawer Assembly
Are you ready to tackle the task of removing your freezer drawer? Let’s dig into the process, step by step. It’s easier than you might think!
Disconnecting The Drawer Slides
Start by unplugging your refrigerator to ensure safety. Next, extend the freezer drawer to reach the slides.
- Find the screws that hold the slides to the drawer.
- Using a screwdriver, remove the screws carefully.
- Detach both slides by gently pushing on the tabs.
- Take your time and keep track of all hardware for reassembly.
Lifting The Drawer Out
With the slides disconnected, you’re ready to lift the drawer out.
- Grip the drawer from both sides.
- Lift the drawer evenly to avoid tilting.
- If the drawer doesn’t come out smoothly, check for remaining screws.
- Place the drawer on a soft surface to avoid scratches.
Troubleshooting Common Issues
Troubleshooting common issues with your Whirlpool French Door refrigerator’s freezer drawer may seem daunting at first. A troublesome freezer drawer can throw a wrench in your kitchen routine. Whether it’s stuck in place or has a broken part, finding the right solution is key. This guide aims to simplify the process and get your freezer drawer functioning smoothly again.
Dealing With Stuck Drawers
A stuck freezer drawer is a common frustration. Follow these steps for a quick fix:
- Empty the Drawer: Remove all items to lessen the weight.
- Defrost: Ice buildup can cause sticking. Perform a manual defrost if necessary.
- Check for Obstructions: Ensure no food packages are caught behind the drawer.
- Adjust Temperature Settings: Sometimes, a slight temperature adjustment prevents ice formation.
If these steps don’t help, inspect the tracks for debris or damage.
Managing Broken Components
Facing broken components requires a careful approach to prevent further damage:
- Identify the Issue: Look for visible signs of damage to rails or the drawer itself.
- Consult the Manual: Your refrigerator’s manual can provide drawer-specific guidance. Check for part numbers and diagrams.
- Order Replacement Parts: Use only genuine Whirlpool parts for a perfect fit.
- Seek Professional Help: If DIY seems overwhelming, contact certified technicians for assistance.
In summary, familiarize yourself with the drawer mechanism, take gentle actions, and prioritize safe handling of parts.
Finishing Steps
Now that you’ve successfully removed the freezer drawer from your Whirlpool French Door refrigerator, it’s time for the finishing steps. These crucial final touches will ensure your refrigerator remains clean, efficient, and safe. Let’s jump right into the tasks at hand.
Cleaning The Freezer Interior
With the drawer out, you have full access to your freezer’s interior. It’s the perfect moment for a deep clean. Here’s how:
- Unplug the refrigerator to keep safe while cleaning.
- Remove any bits of food or debris with a soft brush.
- Mix a solution of warm water and mild detergent.
- Use a soft cloth to wipe down all surfaces.
- Rinse with a damp cloth and dry with a towel.
Inspecting For Potential Hazards
Before sliding the drawer back into place, it’s important to inspect for hazards:
- Check for ice buildup that could interfere with the drawer’s function.
- Look for worn seals or damaged components.
- Ensure no obstructions could harm the drawer mechanism.
After cleaning and checking the freezer, you can reinstall the drawer. Remember to plug the fridge back in. Your refrigerator is now spotless, safe, and ready to use!
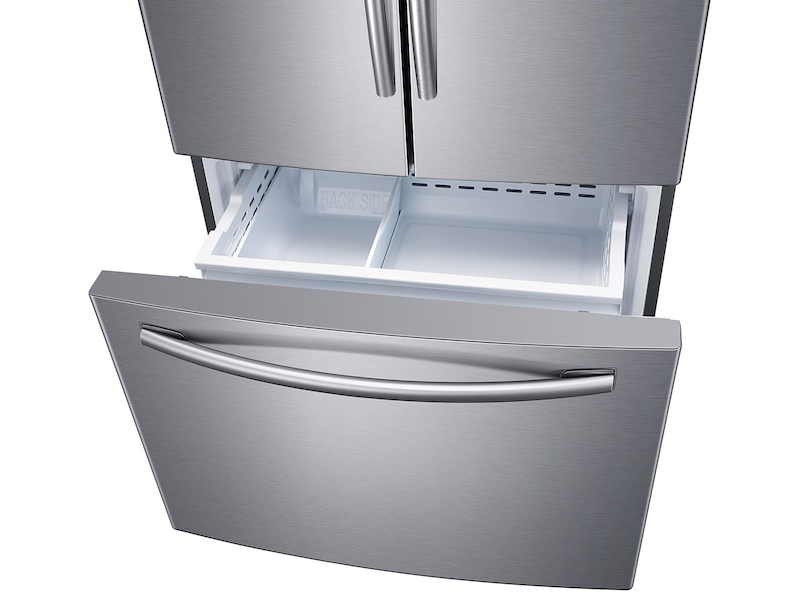
Credit: www.samsung.com
Reassembly And Maintenance Tips
Putting your refrigerator’s freezer drawer back together correctly is key. A smooth process keeps your appliance running well. Good upkeep prevents future problems. Let’s dive into how to reattach your freezer drawer and maintain your fridge effectively.
Reattaching The Freezer Drawer
Follow these steps to put the drawer back in place:
- Slide the rails back into the freezer compartment. Make sure they click into place.
- Align the drawer with the rails. Tilt the drawer slightly to fit it onto the tracks.
- Push the drawer in. You should hear a sound to confirm it’s locked in.
- Test the slide by pulling the drawer out and pushing it back in. It should move easily.
Regular Maintenance For Longevity
- Clean the coils every six months. This helps your fridge stay efficient.
- Defrost your freezer if ice builds up. Thick ice can strain the appliance.
- Wipe down seals with soapy water. This keeps the doors sealing tightly.
- Check the temperature setting. It should be around 0°F for the freezer.
| Care Task | Frequency |
|---|---|
| Clean Coils | Every 6 months |
| Defrost Freezer | As needed |
| Clean Seals | Every 3 months |
| Temperature Check | Monthly |
A well-maintained fridge works better and lasts longer. Stick to the schedule to keep your appliance in top shape.
Frequently Asked Questions On How To Remove Freezer Drawer On Whirlpool French Door Refrigerator
How Do You Remove A Whirlpool Freezer Door?
To remove a Whirlpool freezer door, unplug the appliance and open the door. Remove any shelving, then unscrew the hinge screws. Lift the door off the hinges.
How Do You Put The Bottom Drawer Back In A Whirlpool Freezer?
Align the drawer slides with the tracks inside your Whirlpool freezer. Gently slide the drawer back, ensuring it clicks securely into place. Confirm smooth operation with a pull test.
How Do You Open A Stuck Freezer Drawer?
To open a stuck freezer drawer, first defrost any visible ice with a hairdryer. Gently wiggle the drawer to loosen it, then pull steadily to open. Use silicone spray on runners for smoother movement.
How Do You Remove The Deli Drawer On A Whirlpool Refrigerator?
To remove a Whirlpool refrigerator’s deli drawer, first, open the fridge and pull out the drawer completely. Next, tilt the front of the drawer upward and gently lift the entire drawer out.
Conclusion
Removing the freezer drawer from your Whirlpool French Door Refrigerator can seem daunting at first. By following the steps outlined in our guide, though, you’ll find the process surprisingly straightforward. Regular maintenance and cleaning are now within reach, helping you keep your appliance in optimal condition.
Always remember to refer to the manufacturer’s instructions for specific guidance and safety. Keep your fridge functioning well, and tackle the task with confidence!